Materials:
~
- Size 4 worsted weight yarn
- 5mm hook
- 4.5mm hook
- Yarn needle ( also called canvas needle )
- Stuffing
- Optional-Embellishments
- Fabri-Tac ( if you don’t like sewing )
Key:
~ C.O=Cast on
-Ch=chain
-hdc=half double crochet
-t=turn
-st=Stitch
-sl=Slip stitch
-B.O.=Bind off ( also called fastening off )
-sc=single crochet
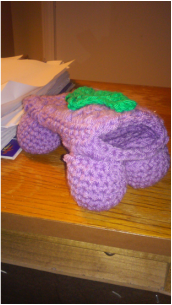
Instructions for the Body:
-C.O. with long tail
-Ch the width of phone + 2 ch
Row 1-Hdc in the 3rd ch from the hook, & in each ch across
Row 2-Ch 2, t, hdc in 2nd st & in each st across
-Repeat Row 2 until the work is twice (or slightly longer ) the length of the actual cell phone.
-If you wish to do the (optional ) trim, do not B.O. If you do not wish to crochet the trim, B.O.
Instructions for the ( optional ) trim
_ In the last row of the body, place 4 hdc in the corner, and in each future corner.
-Evenly hdc across the side (there is no exact science to this, just use your own judgment ).
-When approaching the corner, place 4 hdc in the stitch
-When you reach the chain row, place 1 hdc in the bottom of each ch. When finished with the row, complete the corner.
-When you approach the top (last row of the body before you began the trim ), put 1 hdc in each st until your first of the 4hdc that you completed for the first corner. When at the 4 hdc’s sl into the first hdc.
-B.O. and weave in ends.
Sewing the Sides Together
-Sew the two SIDES of the case closed. Leave the top open for your phone.
-B.O., and weave in ends.
How to make the "legs"
Using a 4.25mm hook, ch 2
-Place 6 sc in the first ch
Row 1-Place 1 st in the first st, mark the st, then place another sc in the same st. Continue to place 2 sc in each st around (12st).
Row 2-Remove st mark, place 1 sc in that st, mark the st you just made (Note: you will always mark the first st of each row). Then, place 2 sc in the next st, repeat the 1,2,1,2 sequence, placing 1 sc in the next st, and 2 in the next st until end of row (18st).
Row 3 to 8-Place 1 sc in each st across the row.
-At the end of your last row, sl in the marked st, B.O. and weave in ends.
-Repeat the pattern until you have 4 “legs” in total.
-When all the “legs” are completed, stuff them based on the weight of your phone (the heavier the phone, the more you should stuff the “legs”.
Assembly
-
If you do not wish to sew on all the legs, you can use a fabric glue (Fabri-Tac for example) to glue the legs on.
-Place 1 leg at each corner of the case ( on the bottom of the case ).
-Let glue dry before using the cell phone case.
-Now CuStOmIzE!! Glue or sew on your favorite accessories! <3
I hope you enjoyed this pattern, if you have any questions, comments, or concerns, please contact me via email: [email protected]
Pattern by: Nathan Hall
If you make this pattern, send me pics!
Instagram: NLH2012
Twitter:@347Nathan
~
- Size 4 worsted weight yarn
- 5mm hook
- 4.5mm hook
- Yarn needle ( also called canvas needle )
- Stuffing
- Optional-Embellishments
- Fabri-Tac ( if you don’t like sewing )
Key:
~ C.O=Cast on
-Ch=chain
-hdc=half double crochet
-t=turn
-st=Stitch
-sl=Slip stitch
-B.O.=Bind off ( also called fastening off )
-sc=single crochet
Instructions for the Body:
-C.O. with long tail
-Ch the width of phone + 2 ch
Row 1-Hdc in the 3rd ch from the hook, & in each ch across
Row 2-Ch 2, t, hdc in 2nd st & in each st across
-Repeat Row 2 until the work is twice (or slightly longer ) the length of the actual cell phone.
-If you wish to do the (optional ) trim, do not B.O. If you do not wish to crochet the trim, B.O.
Instructions for the ( optional ) trim
_ In the last row of the body, place 4 hdc in the corner, and in each future corner.
-Evenly hdc across the side (there is no exact science to this, just use your own judgment ).
-When approaching the corner, place 4 hdc in the stitch
-When you reach the chain row, place 1 hdc in the bottom of each ch. When finished with the row, complete the corner.
-When you approach the top (last row of the body before you began the trim ), put 1 hdc in each st until your first of the 4hdc that you completed for the first corner. When at the 4 hdc’s sl into the first hdc.
-B.O. and weave in ends.
Sewing the Sides Together
-Sew the two SIDES of the case closed. Leave the top open for your phone.
-B.O., and weave in ends.
How to make the "legs"
Using a 4.25mm hook, ch 2
-Place 6 sc in the first ch
Row 1-Place 1 st in the first st, mark the st, then place another sc in the same st. Continue to place 2 sc in each st around (12st).
Row 2-Remove st mark, place 1 sc in that st, mark the st you just made (Note: you will always mark the first st of each row). Then, place 2 sc in the next st, repeat the 1,2,1,2 sequence, placing 1 sc in the next st, and 2 in the next st until end of row (18st).
Row 3 to 8-Place 1 sc in each st across the row.
-At the end of your last row, sl in the marked st, B.O. and weave in ends.
-Repeat the pattern until you have 4 “legs” in total.
-When all the “legs” are completed, stuff them based on the weight of your phone (the heavier the phone, the more you should stuff the “legs”.
Assembly
-
If you do not wish to sew on all the legs, you can use a fabric glue (Fabri-Tac for example) to glue the legs on.
-Place 1 leg at each corner of the case ( on the bottom of the case ).
-Let glue dry before using the cell phone case.
-Now CuStOmIzE!! Glue or sew on your favorite accessories! <3
I hope you enjoyed this pattern, if you have any questions, comments, or concerns, please contact me via email: [email protected]
Pattern by: Nathan Hall
If you make this pattern, send me pics!
Instagram: NLH2012
Twitter:@347Nathan
